
BEFORE YOU BEGIN:
Indications:
Pleural effusion of unknown origin, concern for empyema, symptomatic treatment of a large pleural effusion. Two circumstances in which diagnostic thoracentesis is usually not required: when there is a small amount of pleural fluid and a secure clinical diagnosis (eg, viral pleurisy), or when there is clinically obvious heart failure (HF) without atypical features.Relative Contraindications:
- Uncooperative patient
- Uncorrected bleeding diathesis (INR >2.5, Plts <25, cr>6), small amount of fluid (<1 cm to chest wall) chest wall cellulitis at the site of puncture, severely decreased lung function, high PEEP, or single lung-patient unable to tolerate possible complication (e.g. pneumothorax or hemothorax)
Consent:
Always obtain consent prior to the procedure. Be sure to inform the patient of the reason for the procedure, the proposed benefits, its major risks and the potential management of these complications. It is also best to walk the patient through the steps of the procedure to minimize their anxiety.
Universal Protocol:
Always mark the procedure side (confirmed by ultrasound) with your initials and perform a "time out" to verify correct patient, correct site, and correct procedure.
Materials:
- Thoracentesis kit
- Chlorhexidene swabs
- Blood culture bottles
- Vacutainer bottles
- Sterile gloves
Supervision: Supervision is always recommended. Call the procedure team if your attending cannot supervise you.
NEJM Video: Watch video prior to starting procedure
Ultrasound: is recommended for all bedside procedures. It can be very helpful to:
1. Find the area of fluid where the depth to the lung is the greatest.
2. If possible, 9-10 cm lateral to the spine (avoid intercostal arteries by going just above the rib)
3. Above the 9th rib to avoid hitting below the diaphragm
4. Gauge the distance from skin to fluid
5. Mark a spot between the ribs (for obese patients).
* Never do thoracenteses on both lungs should complications occur.
PROCEDURE STEP BY STEP:
- Patient preparation
- Patient/Relative informed consent
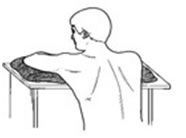
- Recreate the patient's position during the ultrasound.
- The best position is to have a patient curve their back over a table onto a pillow.
- Tap out the location of the fluid by percussion of the chest wall, to locate the upper end of the effusion.
- Measure down two rib interspaces from this upper end of the effusion in the mid-scapular line.
- Confirm this with your bedside ultrasound.
- Mark this space with a pen or needle cap; this will be the needle puncture site.
- Tools Preparation
- Visualize the procedure in your head. Make sure you have everything you will need by the bedside
- Place items you will need quickly on the sterile drape. People often forget to have the tubing and 1 L vacutainer bottles uncapped and nearby.
- Place all patients on oxygen by nasal cannula
- Have an ultrasound machine at bedside
- Perform a timeout right before needle insertion.
- Dispose all sharps into sharps container right after procedure
- Procedure technique:
- Using sterile technique, prep and drape the site of insertion.
- Gel your hands and then put sterile gloves.
- Cleanse the skin with chlorhexidene.
- After cleansing the skin, place the fenestrated drape around the procedure site to create a sterile field and use the large s sterile drape to extend the sterile field.
- Anesthetize. Draw up 1% lidocaine and first administer just below epidermis (attempt to raise a wheal) with a 25-gauge needle. Change to the "finder" 18-22 gauge needle. Change to a 18- 22 gauge needle (1.5 inch) and infiltrate lidocaine on superior aspect of the lower rib, marching up until you are just above the rib and into the pleural space.
- Do not forget to continually “draw back” on the syringe before injecting the lidocaine to ensure you are not in a blood vessel as intravenous lidocaine can be dangerous. Remember the parietal pleura is a very sensitive structure due to its broad innervation with a large number of pain fibers. Make sure to anesthetize this region well, and when you enter the pleural space inject more lidocaine.
For a diagnostic tap, you can use this 18-20 gauge needle attached to a 20-30 cc syringe.
- Do not forget to continually “draw back” on the syringe before injecting the lidocaine to ensure you are not in a blood vessel as intravenous lidocaine can be dangerous. Remember the parietal pleura is a very sensitive structure due to its broad innervation with a large number of pain fibers. Make sure to anesthetize this region well, and when you enter the pleural space inject more lidocaine.
- If performing a therapeutic tap, use the safety catheter in the kit. Practice sliding the sheath over the needle.
- Advance needle over the superior aspect of the low rib, while drawing back on the syringe.
- When you obtain fluid, hold the needle steady, while advancing the soft catheter, then withdraw the needle and place blue clip over needle tip. Never manipulate the needle with the sheath advanced over it in the patient since this can lead to shearing of the sheath.
- Place tubing on to the stopcock and then drain the fluid in your container of choice.
- Removing pleural fluid too quickly or removing more than 1.5 liters of pleural fluid increases the chance for reexpansion pulmonary edema.
- If some fluid comes out and then stops, check your catheter, tubing, etc. Slowly pull out the catheter or have the patient valsalva (this can increase intrathoracic pressure and help the fluid flow).
- If you aspirate air (see air bubbles in your syringe) or the patient develops hypotension, desaturation, or respiratory distress, stop immediately and obtain a CXR or perform immediate needle decompression for tension PTX. If the patient has recently undergone thoracentesis, however, air bubbles may not indicate a pneumothorax.
- When removing the needle, have the patient valsalva to reduce chance of PTX and bandage the site.
- Complete the procedure, check for complications - mainly pneumothorax and bleeding.
AFTER THE PROCEDURE:
- Write a procedure note in EPIC (use notewriter)
- Order a CXR to rule out pneumothorax.
- Dispose of all sharps
- Label, initial and date all sample to be sent to the lab
LABORATORY RESULTS:
Once you've gone through all the work of performing the procedure safely, make sure your specimens get to the lab safely.
- Clear tube in kit: LDH and Protein (both pleural and serum) for Light's criteria and cell count and differential. Depending on your differential, you may also want: pH (put fluid in abg kit), specific gravity, glucose, bilirubin, amylase, lipase, triglyceride.
- Bacteriostat Bottles: Bacterial culture with Gram stain. You should send bacterial culture in blood culture bottles (higher yield), but gram stain and AFB smear and cultures uses a regular tube. Fungal culture is optional and can come from the blood culture tubes.
- Vacutainer bottle or tube in kit: Cytology if malignancy is a concern.
COMPLICATIONS/TROUBLESHOOTING:
- Pneumothorax: Most common symptoms are pleuritic chest pain which may radiate to the shoulder and shortness of breath, but patients are occasionally asymptomatic. Pneumothorax should be suspected with symptoms or if air is aspirated in the thoracentesis syringe. Diagnose with a CXR. Administer oxygen to patient and use tylenol and opiates as appropriate to treat the patient to prevent splinting and atelectasis. In a tension pneumothorax, the patient may be hypotensive, and the CXR will show mediastinal shifting. For small pneumothoraces, monitor with serial CXR. If pneumothorax is large or expanding, or if patient is showing signs of a tension pneumothorax, call thoracic surgery.
- Hemothorax: Occurs as a result of injury to the intercostal arteries. Hemothorax can be avoided by going above the rib, rather than below, where the intercostal vessels and nerves are located. If a hemothorax is equal to or greater than the amount required to obscure the costophrenic sulcus or is found in association with a pneumothorax based on chest radiograph findings, it should be drained by tube thoracostomy. In cases of hemopneumothorax, 2 chest tubes may be preferred, with the tube draining the pneumothorax placed in a more superior and anterior position. Bleeding is usually limited, but ongoing bleeding requires surgical exploration. Call thoracic surgery. Untreated hemothorax can cause fibrothorax or empyema. Metastatic disease and complications of anticoagulation may cause occult hemorrhage. In these situations, bleeding into the pleural cavity occurs slowly, resulting in subtle or absent changes in hemodynamics. Check a CBC and LDH on the fluid to help determine whether the RBCs are old and lysed, or fresh blood.
- Vasovagal: Patient may experience a drop in BP and a vagal response to thoracentesis. Treat supportively with placing the patient in a supine position, administering oxygen, fluids. Rule out pneumothorax with CXR.
- Reexpansion pulmonary edema: Reexpansion pulmonary edema is a rare complication related to the rapid reexpansion of a chronically collapsed lung, such as occurs after evacuation of a large amount of air or fluid from the pleural space. The condition usually appears unexpectedly and dramatically. It generally occurs immediately or within 1 h in 64% of patients, and within 24 h in the remainder. The clinical manifestations are varied; they range from radiographic findings alone in asymptomatic patients to severe respiratory distress and hypotension in more serious cases. CXR will show a unilateral alveolar filling pattern. The edema may progress for 24-48 h and persist for 4-5 days. There is no definitive treatment and though treatment is largely supportive: diuretics, positive pressure ventilation (i.e. BIPAP) and in severe cases intubation are used.
- Hepatic and splenic punctures: Largest concern is for intraperitoneal bleed. With abdominal pain or hypotension, abdominal CT scan is indicated.